Table of content
-
Setting Up the Website with Nginx and Octane
- What is Octane
- Benefits of Using Octane
- Difference from PHP-FPM
- Setting Up Nginx and it’s user
- Setting Up the Laravel Application
- Test Database Connection, Migrate and Seed the Database
- Optimize and cache Laravel configuration
- Starting Octane
- Setup octane as a service
- Setting Up Nginx as a Reverse Proxy
- Getting an SSL Certificate with Certbot and Let’s Encrypt
- Current State
Introduction
In this post, we will be deploying our Laravel project, which includes a Laravel backend integrated with a React frontend. We will utilize various optimizations to achieve the best possible setup. This includes setting up PHP, Octane, connection pools with ProxySQL, Redis cache, and worker pools for Laravel queues. By the end of this guide, you will have a highly optimized and production-ready deployment of your Laravel application on a VPS.
Prerequisites
Before we begin, make sure you have the following:
- A VPS: A fresh installation of a Linux distribution (e.g., Ubuntu 20.04).
- SSH Access: Ensure you have SSH access to the VPS.
- Basic Knowledge: Familiarity with Linux command line operations.
- Laravel Application: A Laravel application ready for deployment.
- Domain Name: Optional, but recommended for easier access.
- Public SSH Key: For secure access to the VPS.
- Git: Installed on your local machine for cloning the repository.
- Composer: Installed on your local machine for managing PHP dependencies.
Installing PHP and Composer on the VPS
To run a Laravel application, we need to install PHP and Composer on our VPS. Follow these steps to set up PHP and Composer:
- Update the package list and upgrade installed packages:
sudo apt update && sudo apt upgrade -y- Install PHP and required extensions:
sudo apt install php-mysql php-xml php-mbstring php-zip php-curl -y- Verify php installation:
php -v- Install Composer:
sudo apt install curl -y
curl -sS https://getcomposer.org/installer | php
sudo mv composer.phar /usr/local/bin/composer- Verify composer installation:
composer -vWith PHP and Composer installed, we are now ready to proceed with setting up our Laravel application on the VPS. Note that this has installed php and composer for all the users on our linux machine.
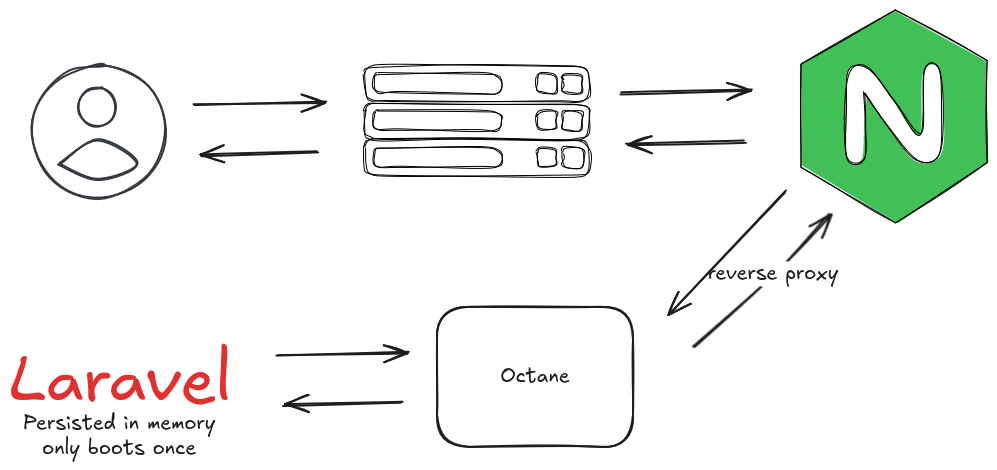
Setting Up the Website with Nginx and Octane
To set up our website, we need to install Nginx, create a user to handle the web server, clone the website, initialize the Laravel project, configure environment variables, test the database connection, migrate and seed the database, start Octane, and set up Nginx as a reverse proxy.
What is Octane
Laravel Octane is a package that supercharges your Laravel application’s performance by running it as a long-lived process. Unlike the traditional PHP-FPM setup, where the Laravel application is booted on each request, Octane keeps the application in memory, significantly reducing the overhead of booting the framework for every request
Benefits of Using Octane
- Performance: By keeping the application in memory, Octane eliminates the need to boot the Laravel framework on each request, resulting in faster response times.
- Concurrency: Octane supports concurrent request handling, which can improve the throughput of your application.
- Scalability: With Octane, you can handle more requests per second, making your application more scalable.
Difference from PHP-FPM
- PHP-FPM: Each request to the server boots the entire Laravel framework, processes the request, and then shuts down. This can introduce latency due to the repeated bootstrapping process.

- Octane: The application is booted once and kept in memory, allowing subsequent requests to be handled much faster as the framework does not need to be reloaded.
By using Octane, you can achieve a more efficient and performant Laravel backend, making it well-suited for high-traffic applications.
Setting Up Nginx and it’s user
- Install Nginx:
sudo apt install nginx -y- Start and enable Nginx:
sudo systemctl start nginx
sudo systemctl enable nginx- Create a new user for Nginx:
sudo adduser --system --no-create-home --group wwwSetting Up the Laravel Application
- Clone your Laravel application from the repository:
sudo mkdir -p /var/www/your-laravel-app
sudo chown -R www:www /var/www/your-laravel-app
cd /var/www/your-laravel-app
sudo git clone https://github.com/<yourusername>/<your-laravel-app>.git .- Install Laravel dependencies:
sudo -u www composer install --optimize-autoloader --no-dev- Copy the
.env.examplefile:
sudo -u www cp .env.example .env- Generate the application key:
sudo -u www php artisan key:generate- Update the .env file with your database and other configuration settings:
sudo -u www vim .envTest Database Connection, Migrate and Seed the Database
- Test the database connection:
sudo -u www php artisan migrate:status- Run the database migrations:
sudo -u www php artisan migrate --force- Run the database seeders (if any):
sudo -u www php artisan db:seed --forceOptimize and cache Laravel configuration
- Optimize the Laravel configuration:
sudo -u www php artisan config:cache- Cache the routes:
sudo -u www php artisan route:cache- Optimize the application:
sudo -u www php artisan optimizeStarting Octane
- Install the Octane package:
sudo -u www composer require laravel/octane- Setup Octane:
sudo -u www php artisan octane:installThis will install the underlying php runtime and octane configuration file. The runtime will be automatically downloaded. 3. Start Octane:
sudo -u www php artisan octane:startThis will start octane as a forground running process. You can stop it by pressing Ctrl + C, for the moment don’t stop it, open another ssh connection and type the commande below to check if octane is running:
curl localhost:8000You should see the response of your laravel application. If you see the response, then octane is running correctly you can stop it by pressing Ctrl + C.
Setup octane as a service
- Create a new service file:
sudo vim /etc/systemd/system/octane.service- Add the following content to the file:
[Unit]
Description=Octane Service
After=network.target

[Service]
Type=simple
User=www
Group=www
WorkingDirectory=/var/www/your-laravel-app

ExecStart=/usr/bin/php /var/www/your-laravel-app/artisan octane:start
Restart=on-failure

[Install]
WantedBy=multi-user.target- Reload the systemd daemon:
sudo systemctl daemon-reload- Start and enable the Octane service:
sudo systemctl start octane
sudo systemctl enable octane
Setting Up Nginx as a Reverse Proxy
- Create a new Nginx configuration file:
sudo vim /etc/nginx/sites-available/yourdomain.com- Add the following content to the file:
server {
  listen 80;
  server_name yourdomain.com;
  root /var/www/your-laravel-app/public;

  index index.php;
  charset utf-8;

  location ~* \.(?:css|js|gif|jpg|jpeg|png|ico|woff2?|ttf|svg|eot|otf|webp|avif)$ {
    expires 30d;
    add_header Cache-Control "public, max-age=2592000, immutable";
    access_log off;
  }

  location / {
    proxy_set_header Host $host;
    proxy_set_header X-Real-IP $remote_addr;
    proxy_set_header X-Forwarded-For $proxy_add_x_forwarded_for;
    proxy_set_header X-Forwarded-Proto $scheme; # This is crucial
    proxy_buffer_size 16k;
    proxy_buffers 4 32k;
    proxy_busy_buffers_size 64k;
    # Forward to Octane
    proxy_pass http://127.0.0.1:8000;
  }

  # Disable logging for certain files
  location = /favicon.ico { access_log off; log_not_found off; }
  location = /robots.txt { access_log off; log_not_found off; }

  error_log /var/log/nginx/yourdomain.com_error.log;
  access_log /var/log/nginx/yourdomain.com_access.log;

  error_page 404 /index.php;

}- Enable the new configuration and restart Nginx:
sudo ln -s /etc/nginx/sites-available/yourdomain.com /etc/nginx/sites-enabled/
sudo nginx -t
sudo systemctl restart nginx
With these steps, your Laravel application should be up and running with Nginx and Octane on your VPS. You can now access your application using your domain name or IP address.
Getting an SSL Certificate with Certbot and Let’s Encrypt
- Install Certbot:
sudo apt update
sudo apt install certbot python3-certbot-nginx -y- Obtain an SSL certificate:
sudo certbot --nginx -d yourdomain.comFollow the prompts to complete the installation. Certbot will automatically configure Nginx to use the new SSL certificate.
With these steps, your Laravel application will be secured with an SSL certificate from Let’s Encrypt, ensuring encrypted communication between your server and clients.
Current State
At this point, we have a fully functional Laravel Octane and Nginx setup with a secure HTTPS connection. Our Laravel application is running efficiently with Octane, and Nginx is configured as a reverse proxy. Additionally, we have successfully connected to the database, ensuring that our application can interact with the database securely and efficiently.
Setting Up Connection Pools with ProxySQL
The probleme with PHP and laravel MySQL connections
In a typical Laravel application, a new database connection is established for each query on every request. This can become a significant performance bottleneck, especially when the database server is not on the same host and could be on a different network altogether. The time required to establish each TCP connection can accumulate, leading to increased latency and reduced performance in large-scale applications.
Solution: Connection Pools with ProxySQL
To address this issue, we will use ProxySQL, a high-performance SQL proxy. ProxySQL helps by establishing a connection pool to our MySQL server and maintaining persistent TCP sockets between itself and the database server. This means that instead of establishing a new connection for each query, Laravel will connect to ProxySQL on localhost, which is much faster. ProxySQL will then route the query to the MySQL server, reducing the overhead of establishing new connections.
Benefits of Using ProxySQL
- Connection Pooling: ProxySQL maintains persistent connections to the database server, reducing the overhead of establishing new connections.
- Load Balancing: ProxySQL can distribute queries across multiple database servers, improving performance and scalability.
- Query Caching: ProxySQL can cache query results, reducing the load on the database server and improving response times.
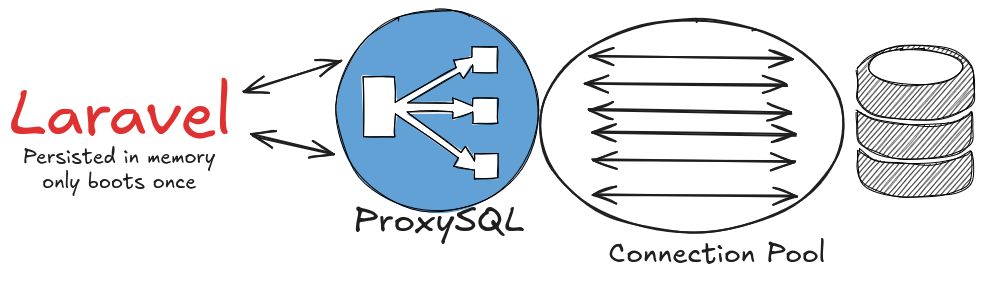
By using ProxySQL, we can optimize our Laravel application’s database interactions, making it more efficient and scalable.
Installing and Configuring ProxySQL
We will be installing proxySQL on it’s own directory on /opt and with it’s own user and group. This will make server and security management easier.
- Install ProxySQL:
- Create a new user and group for ProxySQL:
sudo adduser --system --no-create-home --group proxysql- Download the ProxySQL .deb package:
cd /tmp
wget https://github.com/sysown/proxysql/releases/download/v2.0.17/proxysql_2.0.17-debian10_amd64.deb- Extract ProxySQL into /opt/proxysql
sudo dpkg -x proxysql_2.0.17-debian10_amd64.deb /opt/proxysql- Create var and data Folders
sudo mkdir -p /opt/proxysql/var
sudo mkdir -p /opt/proxysql/data
sudo chown -R proxysql:proxysql /opt/proxysql- Modify the proxysql.cfg
sudo vim /opt/proxysql/proxysql.cfg- Add the following content to the file:
datadir="/opt/proxysql/var/lib/proxysql"
errorlog="/opt/proxysql/var/lib/proxysql/proxysql.log"

admin_variables=
{
	admin_credentials="admin:admin"
	mysql_ifaces="127.0.0.1:6032"
}

mysql_variables=
{
	threads=4
	max_connections=2048
	default_query_delay=0
	default_query_timeout=36000000
	have_compress=true
	poll_timeout=2000
	interfaces="0.0.0.0:6033"
	default_schema="information_schema"
	stacksize=1048576
	server_version="5.5.30"
	connect_timeout_server=3000
	monitor_username="monitor"
	monitor_password="monitor"
	monitor_history=600000
	monitor_connect_interval=60000
	monitor_ping_interval=10000
	monitor_read_only_interval=1500
	monitor_read_only_timeout=500
	ping_interval_server_msec=120000
	ping_timeout_server=500
	commands_stats=true
	sessions_sort=true
	connect_retries_on_failure=10
have_ssl = false
}

# defines all the MySQL servers
mysql_servers =
(
{
  address=<remote_ip_or_host>
  port=<remote_port>
  hostgroup=0
  max_connections=100
}
)


# defines all the MySQL users
mysql_users:
(
{
  username="user"
  password="pass"
  default_hostgroup=0
}
)
Change the host and the port of the remote mysql database and the user credetials.
Creating and Configuring ProxySQL service
- Create a new service file:
sudo vim /etc/systemd/system/proxysql.service- Add the following content to the file:
[Unit]
Description=High Performance Advanced Proxy for MySQL
After=network.target

[Service]
User=proxysql
Group=proxysql
Type=forking
RuntimeDirectory=proxysql
ExecStart=/opt/proxysql/usr/bin/proxysql --idle-threads  -c /opt/proxysql/etc/proxysql.cnf -D /opt/proxysql/var/lib/proxysql --initial
PIDFile=/opt/proxysql/var/lib/proxysql/proxysql.pid
SyslogIdentifier=proxysql
Restart=no
User=proxysql
Group=proxysql
PermissionsStartOnly=true
UMask=0007
LimitNOFILE=102400
LimitCORE=1073741824
ProtectHome=yes
NoNewPrivileges=true
CapabilityBoundingSet=CAP_SETGID CAP_SETUID CAP_SYS_RESOURCE
RestrictAddressFamilies=AF_INET AF_INET6 AF_UNIX AF_ALG
ProtectSystem=full
PrivateDevices=yes


[Install]
WantedBy=multi-user.target- Reload systemd and start ProxySQL:
sudo systemctl daemon-reload
sudo systemctl start proxysql
sudo systemctl enable proxysql- Check the status of ProxySQL:
sudo systemctl status proxysqlWith these steps, ProxySQL will be installed and configured on your server, ready to optimize your Laravel application’s database connections.
Configuring Laravel to Use ProxySQL
To configure Laravel to use ProxySQL, update the database configuration in your .env file to point to the ProxySQL server instead of the MySQL server. Update the DB_HOST, DB_PORT variables to match the ProxySQL configuration.
...
DB_CONNECTION=mysql
DB_HOST=127.0.0.1
DB_PORT=6033
...
With this configuration, Laravel will connect to ProxySQL on localhost, which will route the queries to the MySQL server, optimizing the database connections.
Current State
At this point, we have successfully installed and configured ProxySQL on our server. We have:
With ProxySQL running, our Laravel application can now benefit from connection pooling and persistent connections, significantly improving performance by reducing the overhead of establishing new connections for each query. This setup ensures that connections to the MySQL server are efficiently managed, providing a faster and more scalable application.
Caching and Redis
Currently, our Laravel application is using disk caching, which can be slower compared to an in-memory cache like Redis. Redis is a high-performance, in-memory data store that can be used as a cache to speed up our application by reducing the time it takes to retrieve frequently accessed data.
By using Redis, we can significantly improve the performance of our application by storing cache data in memory, which is much faster than reading from disk. This can lead to faster response times and improved scalability, making our application more efficient.
Installing and Configuring Redis
To install Redis, follow these steps:
- Install Redis:
sudo apt update
sudo apt install redis-server -y- Configure Redis:
sudo vim /etc/redis/redis.confFind the supervised directive and set it to systemd:
supervised systemd- Start and enable Redis:
sudo systemctl restart redis
sudo systemctl enable redis- Verify Redis is running:
redis-cli pingYou should see the response PONG.
Configuring Laravel to Use Redis
- To configure Laravel to use Redis for caching, update the
CACHE_DRIVERandSESSION_DRIVERvariable in your.envfile to use Redis:
CACHE_DRIVER=redis
SESSION_DRIVER=redis- Update the
REDIS_HOSTandREDIS_PORTvariables to match the Redis configuration:
SESSION_DRIVER=redis
REDIS_CLIENT=phpredis
REDIS_HOST=localhost
REDIS_PASSWORD=null
REDIS_PORT=6379
CACHE_DRIVER=redis
QUEUE_CONNECTION=redis- Install predis package:
sudo -u www composer require predis/predis- Clear the Laravel cache:
sudo -u www php artisan cache:clear- Regenerate the Laravel configuration cache:
sudo -u www php artisan config:cache
sudo -u www php artisan optimize- Restart the Laravel application:
sudo systemctl restart octaneWith Redis configured, our Laravel application will now use Redis as the cache store, improving performance by storing cache data in memory.
Configuring the Firewall on Ubuntu
To enhance the security of your VPS, it’s important to configure the firewall to allow only necessary ports. In this case, we will allow only SSH (port 22), HTTP (port 80), and HTTPS (port 443) connections. Of course we can also configure firewall rules on the VPC level (for AWS or GCP), VNet ( for Azure ) or the VCN ( for OCI ) to restrict the access to the VPS. But for this article i will be focusing on the VPS level.
- Install UFW (Uncomplicated Firewall):
sudo apt install ufw -y- Allow SSH, HTTP, and HTTPS connections:
sudo ufw allow ssh
sudo ufw allow http
sudo ufw allow https- Enable the firewall:
sudo ufw enable- Check the status of the firewall:
sudo ufw statusWith these steps, your firewall is configured to allow only SSH, HTTP, and HTTPS connections, enhancing the security of your VPS by blocking all other ports.
Finale State
At this point, we have successfully deployed our Laravel application to a production-ready VPS. We have:
- Set up PHP and Composer.
- Configured Nginx and Laravel Octane for optimal performance.
- Secured our application with an SSL certificate from Let’s Encrypt.
- Installed and configured ProxySQL for efficient database connection pooling.
- Installed and configured Redis for faster caching.
- Configured the firewall to allow only necessary ports (22, 80, 443).
Our Laravel application is now running efficiently with a secure HTTPS connection and optimized database interactions.
Conclusion
Deploying a Laravel application to a production-ready VPS involves several steps to ensure optimal performance, security, and scalability. By following this guide, you have set up a robust environment for your Laravel application, leveraging tools like Nginx, Laravel Octane, ProxySQL, and Redis to enhance performance and reliability.
What’s Next
In the next article, we will dive into monitoring your server and application. We will explore tools and techniques to keep an eye on your server’s performance, detect issues early, and ensure your application runs smoothly. Stay tuned for a comprehensive guide on server monitoring and maintenance.